
Wedding Cake for Akiva – Vanilla Cake with Vanilla Buttercream Frosting
My next door neighbor Lisa is the kind of neighbor people dream about having. Setting aside that she is a dear, close friend, she’s the neighbor that if your alarm goes off (at outrageous hours and too often, till it was fixed) will (literally) jump over the gate with a ladder, brandishing a broom and making sure it’s safe if you are away. Literally. When she knows we are out of the country (currently in Corona time a vague and distant memory), she WhatsApps you to invite you for Shabbat dinner upon your return. And of course, your mom is included in the invite.
When our youngest son Netanel’s wedding day rolled around, she appeared at our door bearing bagels and spreads enough for a small army (good thing too, his friends were all over the house!) and said, I didn’t want you to worry about lunch. And she’s done this for my sister-in-law oodles of times etc. etc. Just a background thing, this is who Lisa is. She is always involved in good deeds and good works and I love her.
So, imagine how I felt when with the ever changing rules, her son Akiva who was initially gonna have a 500 person wedding (Lisa and her hubby have a lot of friends), the rules changed to 250 people, then 100 people, then 50 people. And from a lovely big wedding in a wedding hall, it became a backyard wedding. Akiva is her youngest, a year younger than our Netanel. DH and I have watched him grow up from an adorable little kid to a lovely young man, got to know the (at first girlfriend) Penina become fiancee Penina and since we really know both the young couple and all the kids, grandkids, aunts and uncles and grandparents, it hit me very hard that many of them couldn’t fly in for the wedding and it was going to be a very different sort of event. Thank G-d all her kids and grandkids live here so there’s that.
I offered our garden so the overflow would be able to at least watch the chupa from our side of the fence but in the end me, DH and Nancy another terrific friend and neighbor watched, socially distanced of course and with masks, from across the way and everyone else had live streaming. It turned out to be a beautiful and special occasion, different from the larger type of weddings, with family and a handful of the bride and groom’s friends.
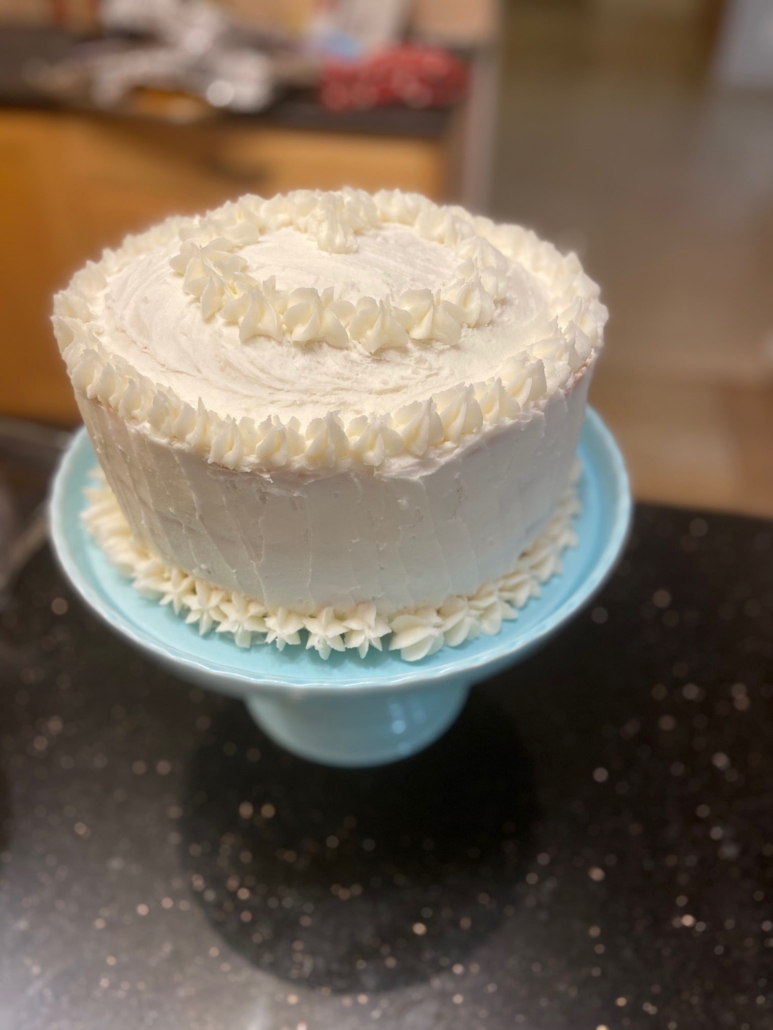
So, how do you give back to such an amazing person and her wonderful kids and family? I offered to bake challah and cake. There wasn’t much else I could do (she had a caterer). So, for the first time ever, I decided to make a wedding cake, no tiers since I lack the equipment but at least a cake for a wedding couple to make them happy. So I did, and had the good fortune of bringing the goodies over for the 7 brachot (that’s when she needed it) and lo and behold, the bride and groom were there stacking chairs from the wedding and got the sneak preview and were delighted (they thought I was gonna bake chocolate chip cookies or something). So I told them the truth, this cake has a piece of my heart. Mazal tov to you all, a beautiful family, may you only always have joy and happiness.
On to the cake. The cake part is a recipe from Deb Perlman of Smitten Kitchen. Although I have many good vanilla cake recipes, I wanted tried and true so, thanks Deb, it was amazing. * However, I wanted a regular vanilla buttercream and for that I went to Sally’s Baking Addiction ** and people, it’s an outrageous combo. The buttercream makes a whopping 9 cups of frosting, which may seem insane but is truly necessary if you want to properly decorate the cake. Remember, this is a wedding cake so it’s not your average thing.
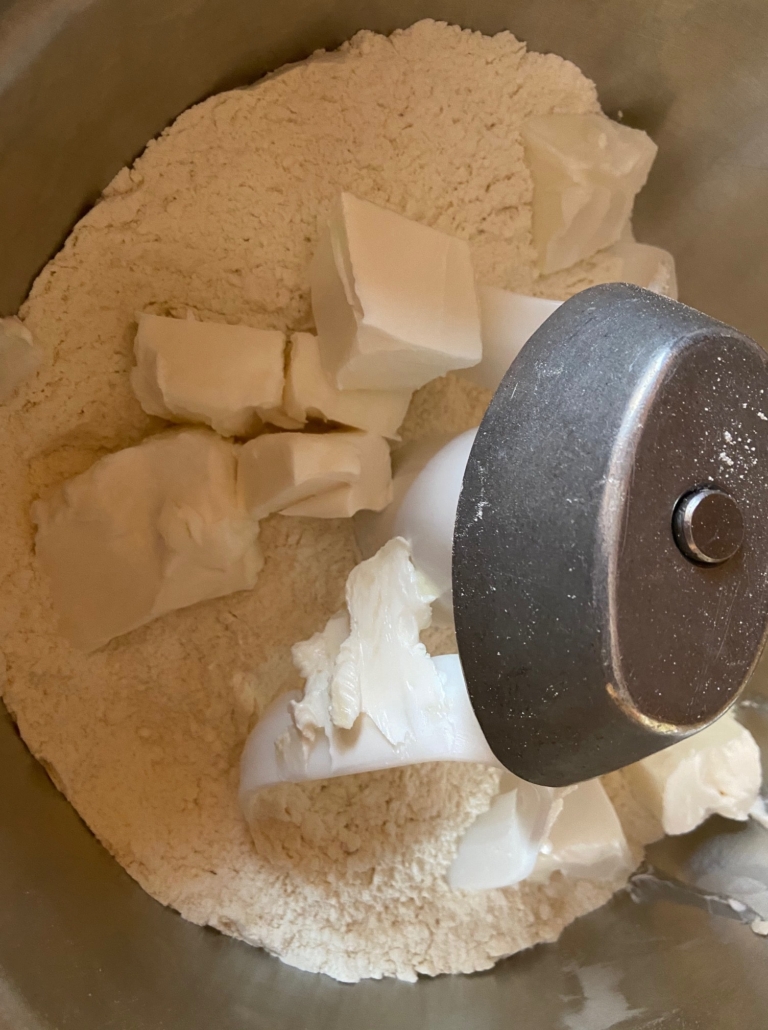
Starting with Deb’s recipe (I hardly changed it at all, really), you mix together the dry ingredients and chunk in the super super softened butter/marg. I’m talking nearly dissolving. The best way to go about this is to leave it out overnight (hey, Ina does it, so can I) and it needs to be so pliable that it melds into the cake and frosting. Forget your diet (hey, I didn’t even eat it!) this requires ridiculous amounts of butter/marg, powdered sugar and just forget it. If you want healthy, bake a carrot cake.
Beat together while adding most of the buttermilk (or soy milk with vinegar, like I used) till a fluffy nice batter that’s quite thick forms.
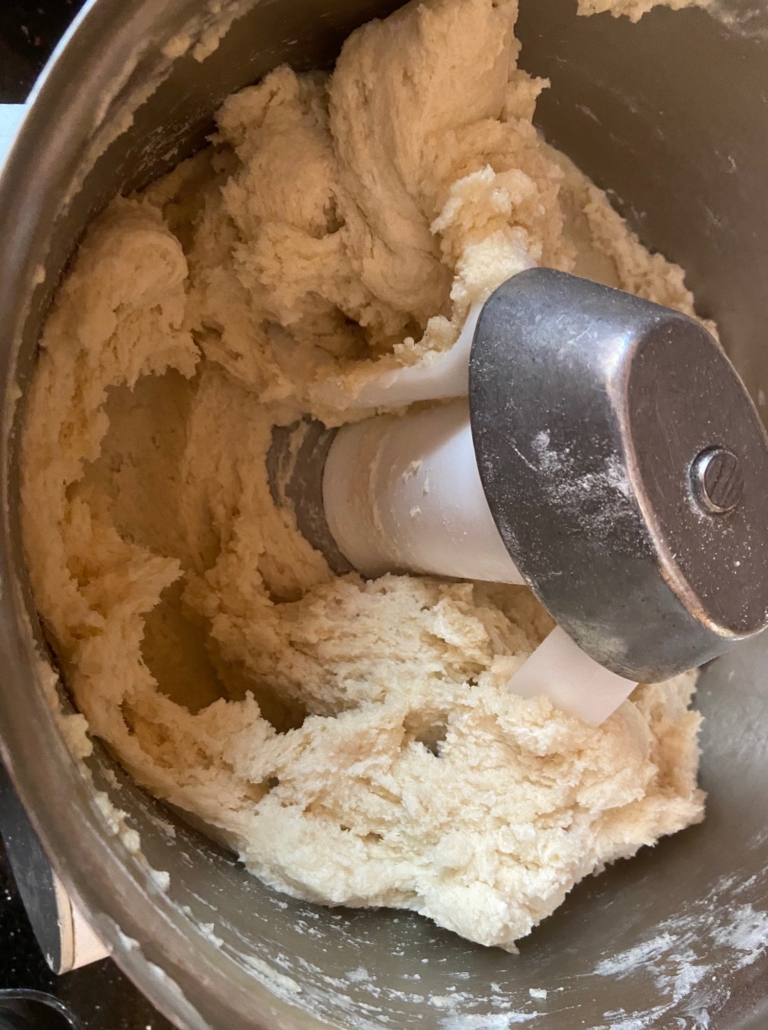
Now despite the fact that the marg is super soft, you must must must scrape the bottom and sides of the mixer. What happens if you don’t? Simple, you get awful pockets of not properly incorporated butter/marg and the cake develops these hideous bubbles and pockets. So do the scraping thing, it makes a world of difference.
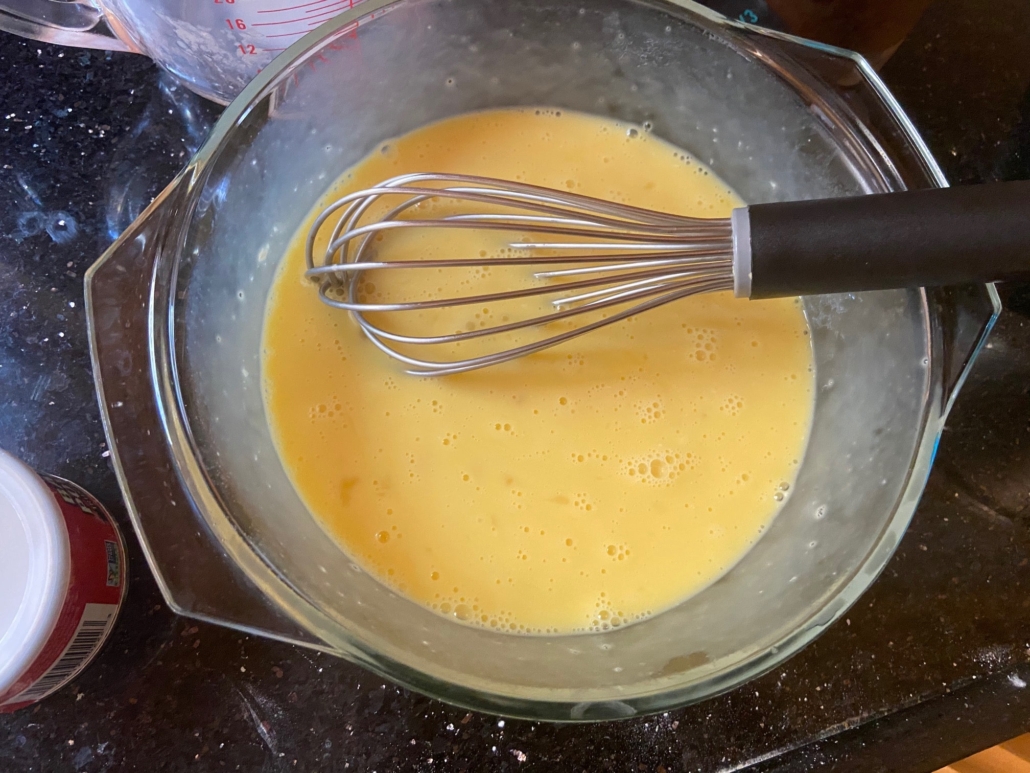
Then mix together the eggs and the 1/3 cup of remaining buttermilk till combined in a separate bowl.
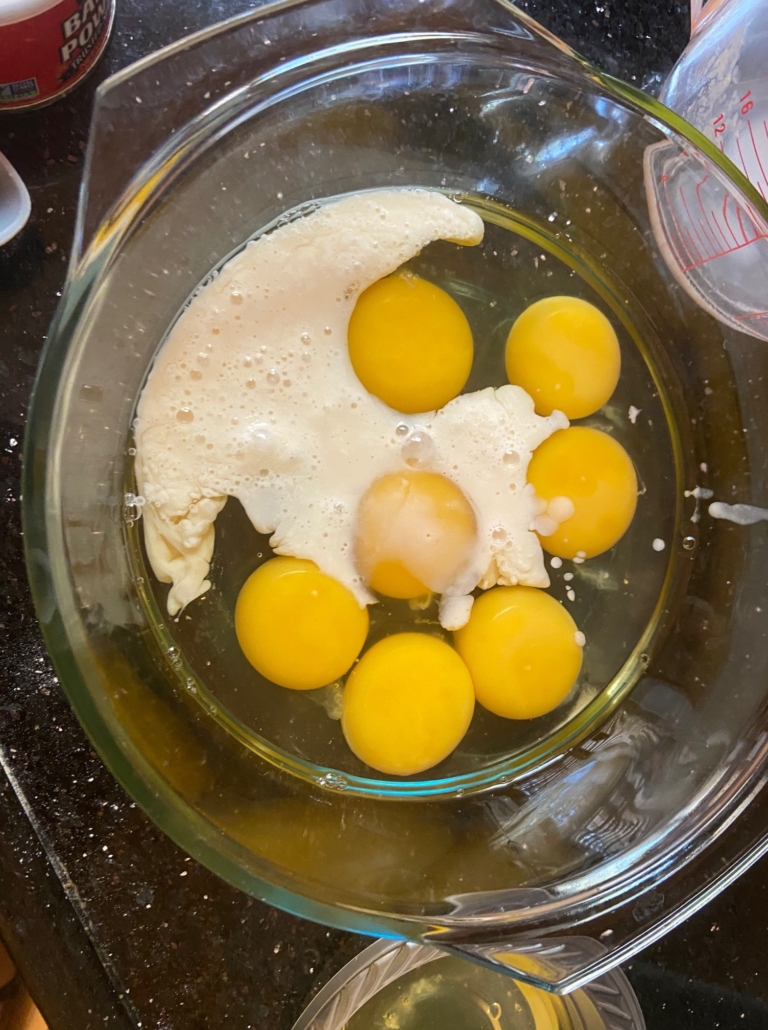
whisk together till combined.
Turn on the mixer on low and add in thirds the egg mixture, stopping and scraping down sides and bottom until a nice thick and smooth batter forms.
This is not stand a spoon up in it but nice and thick. Good, cake’s ready for the pans. Which I actually prepare first, but it’s all good. You need 3 9 inch round pans for this and must spray the pans, then insert parchment paper (I still have some rounds left, yay, or cut them into rounds to fit the pans) and then spray the parchment paper. Yup yup, you’re reading it right. There is nothing worse than all your hard work going down the tubes because the cake sticks and half a cake comes out. GAH, just no. So do this please.
Now most people don’t have a food scale. I had two, then Netanel “borrowed” one (never ever saw it again) and I bought another. But that’s me and I don’t expect you guys to do that. So we will measure the amount by cups instead. Now I love Deb’s blog but I just didn’t get 9 cups of batter out of this mixture and I’ve made it more than once. I get 7 and 1/2 cups. The most important part here is that the layers are even, so just measure the batter in a cup and divide into 3 equal amounts. For me, it’s 2 1/2 cups per 9 inch pan. This is plenty since the batter rises.
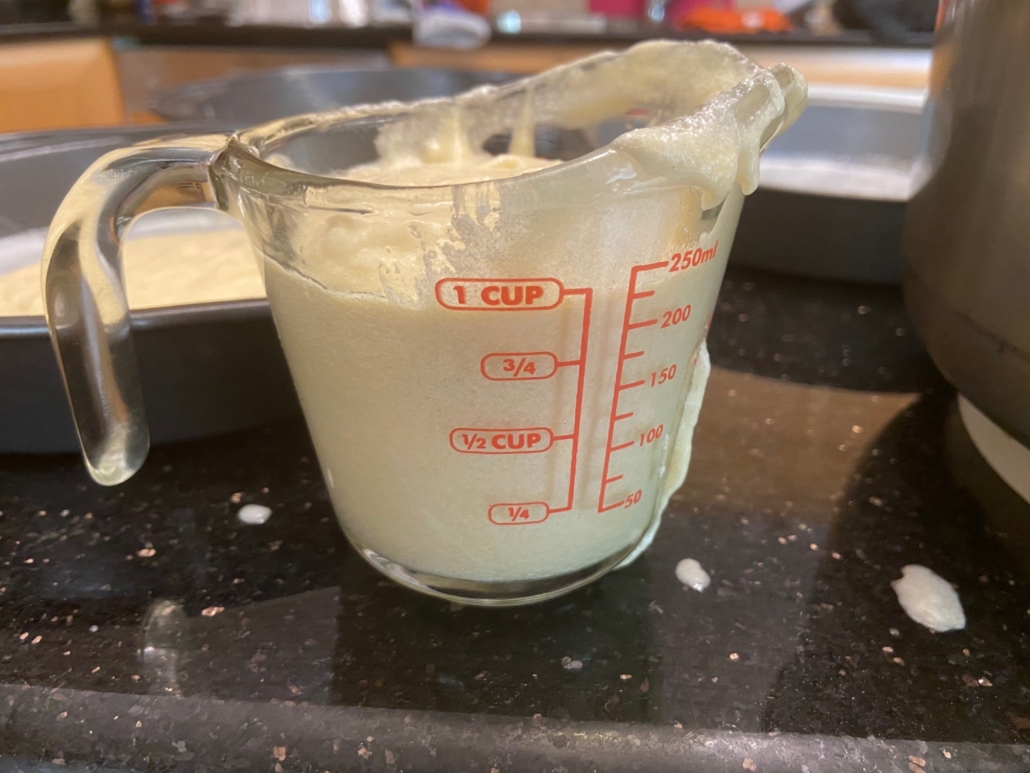
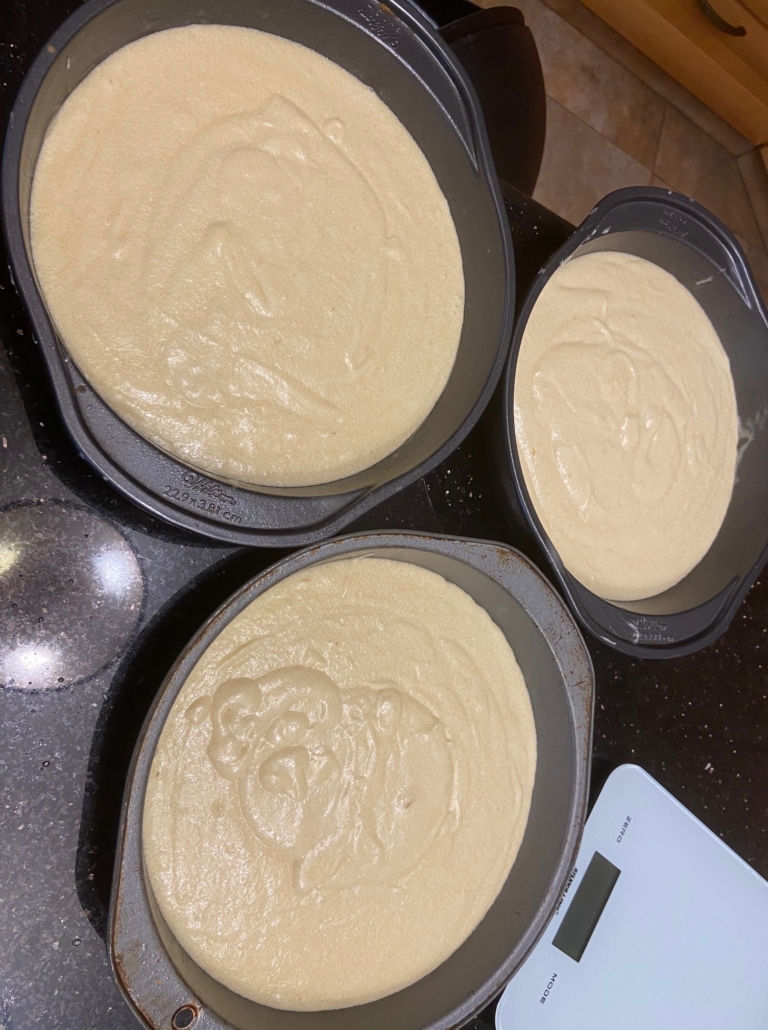
So I put in 2 1/2 cups into each prepared pan and tap them to even out the batter. It’s a drop less than half a pan of batter. No worries, it rises, as I said. Bake in a preheated oven at 325 F. Note, not 350, 325. Do not by accident bake at the higher temp or you will overbake your batter. I baked mine for 30 minutes to perfectly baked, check after 28 minutes with a wooden toothpick which should come out clean. Cool on wire racks. I leave them in the pan to cool for at least 5 minutes and then you can cool on the racks directly, gently flipping out carefully and peeling off the parchment paper.
Prepare the frosting while the cakes cool.
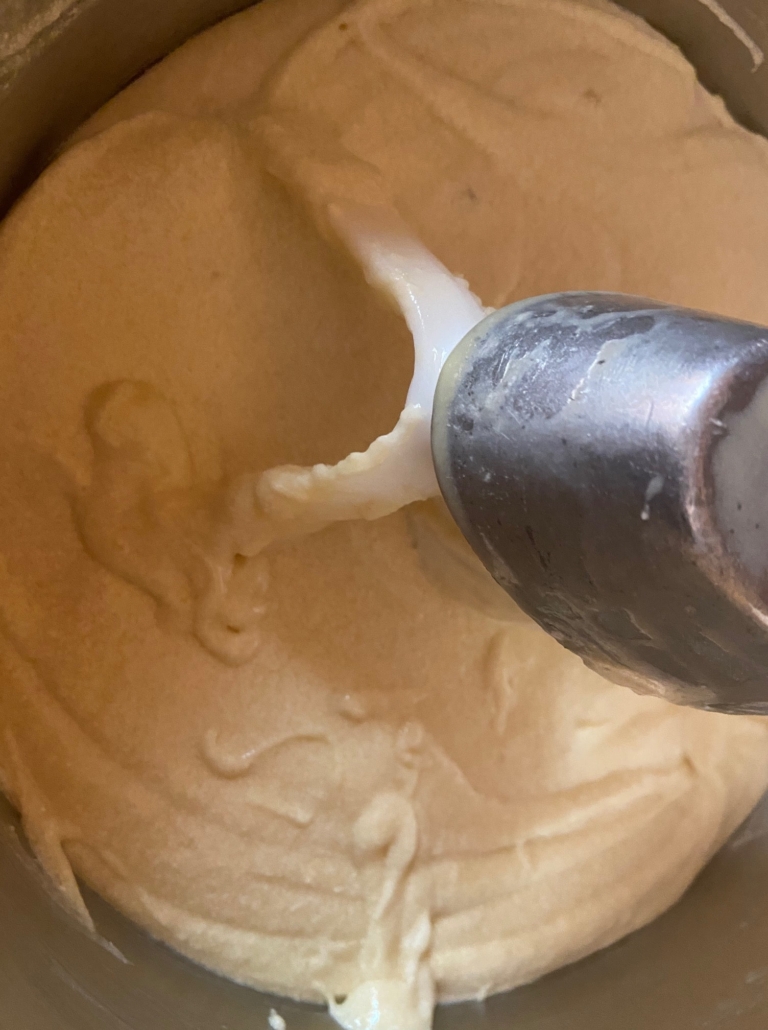
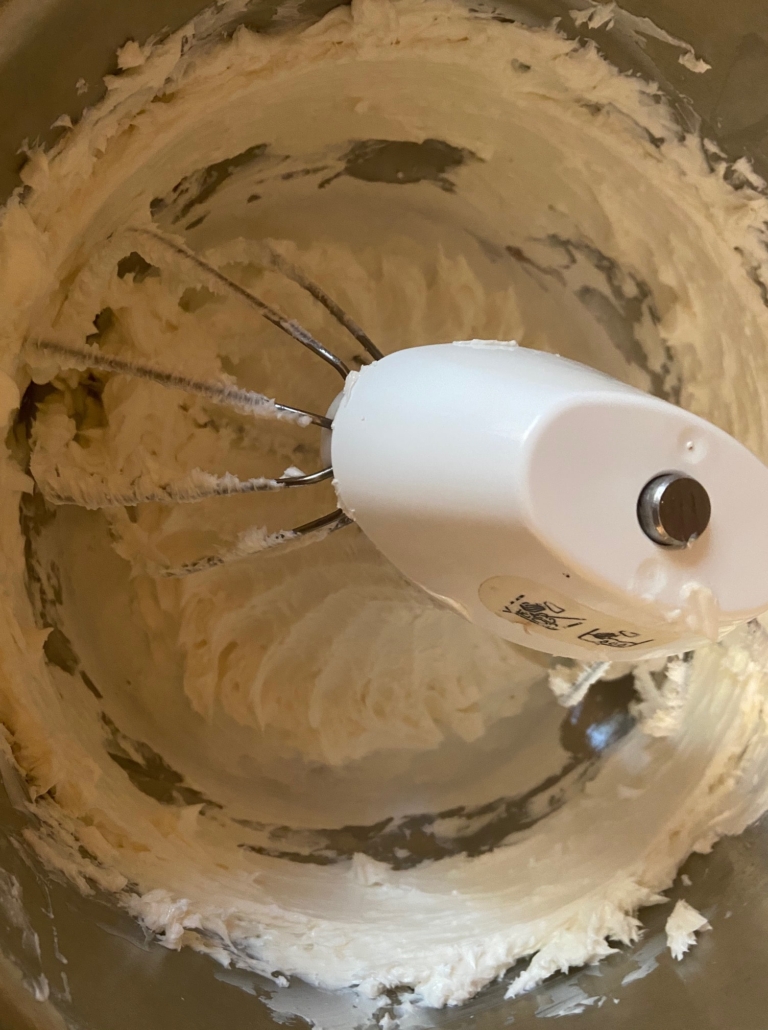
This is wonderful frosting, just mix all the ingredients together (soft soft soft butter/marg) with a mixer and a whisk attachment and it’s amazingly spreadable, measure carefully. It’s a bright shiny white.
Scrape out every bit of the frosting into a bowl for ease of use. Use either a knife, thin spatula or if you have one an offset spatula to spread the frosting. Taking a small amount of frosting, spread onto the first layer on top, (you may need to shave a bit of the dome off the cake to have a flatter surface, although the truth is, frosting is amazingly forgiving. Just slather extra to hide any imperfections and also the gap between layers. You can absolutely cheat 😉 .) Stack the next layer, spread the next top, top with final layer and then thinly coat the sides and final top with frosting. Don’t be generous, like so.
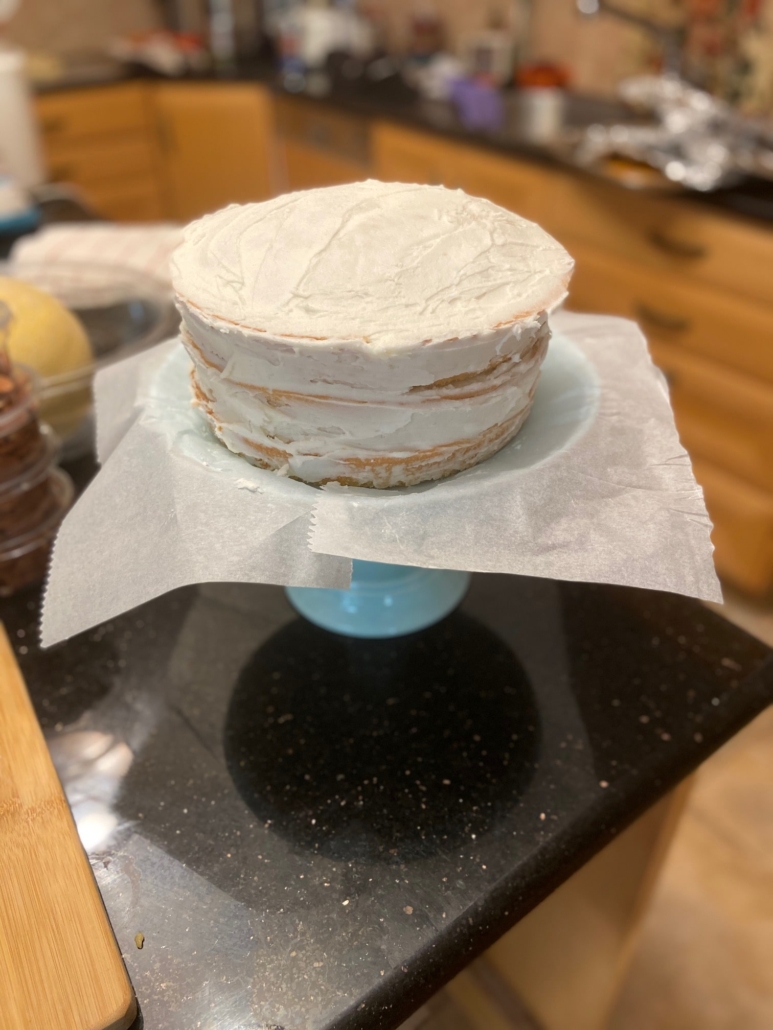
Yes, you are supposed to see the cake through the frosting. Why? you might legitimately ask? It’s called a crumb coat. What this does is thinly coat your cake, you let it set up, preferably in the fridge for 1/2 an hour, so when you touch it lightly with your finger, it’s no longer sticky/tacky and the crumbs from the cake won’t get pulled into the frosting. Think of it as a layer of foundation before you put on makeup, it’s preparing the surface so your frosting will be pristine. Yes, you should do this, it’s the difference between very homemade and more professional looking, and it’s easy to do.
Good, onward. Take out of the fridge. Now you can slather the top of the cake and smooth the sides with the additional frosting and make either lines up and down, little swirls or simply smooth sides, as you wish, personally I did up and down lines on the sides- easy peasy. Now for the fancy part. Take a large large frosting tip and put in a decorating/pastry bag (worth buying a packet of plastic ones, use and toss, a mess to clean otherwise).
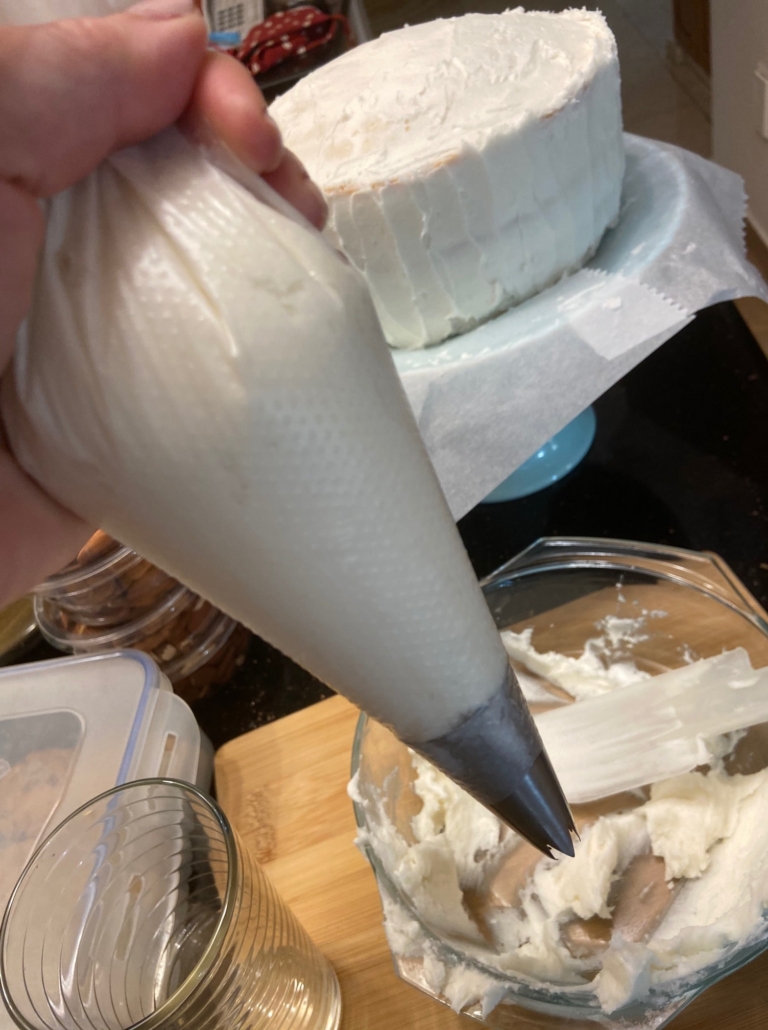
and just practice on some tin foil or plastic wrap a bit. Don’t like how it came out? Scoop it back into the bag and do another practice run. If it feels like it’s getting too soft, pop in the fridge for a bit to stiffen a tad (but not too long, about ten minutes is plenty). Then let your inner creative critter free. There are many good YouTube videos for help should you wish to avail yourself. I used a large flower tip. Don’t use those tiny kind, it’ll take you twice as long and just remember, after you’ve smoothed the top and sides of the cake, you don’t need to go nuts. Just pipe some pretty edging along bottom and edge of cake with maybe a bit on top. If you have a nice plastic bride and groom like me, gently place on top to the joy of all.
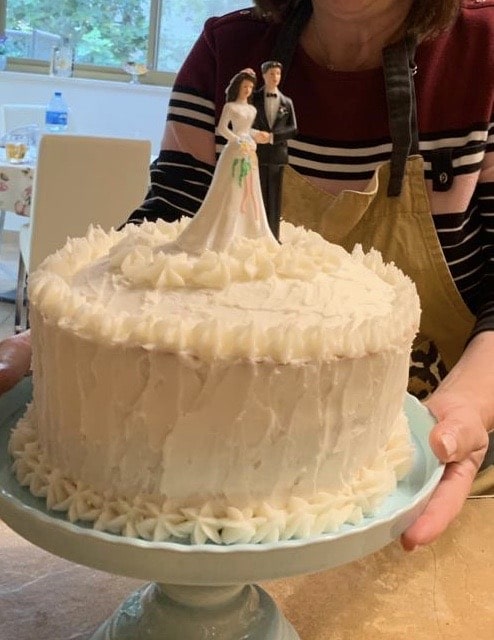
And the verdict? They loved the cake and did a whole cake cutting ceremony. Ain’t it grand?
As for me, I redid the cake scaled down by 2/3 and used a bit of leftover frosting for Shabbat. Amazingly tender and delish. And maybe I already made another birthday cake with this and saved one layer and some frosting for the next Shabbat. C’mon, if it’s not for a wedding, 2 layers is plenty. Fabulous vanilla cake, fabulous frosting. And nobody better say, this tastes so vanilla.
One last note, the cakes freeze fabulously well. If you wanna, you can freeze and then frost when you need them.
Vanilla Cake with Vanilla Buttercream Frosting
3 3/4 cups flour
1 tablespoon and 2 3/4 teaspoons baking powder
2 1/2 cups sugar
1/2 teaspoon salt
10 ounces/283.50 grams/2 1/2 sticks butter/margarine at room temperature – best if you leave it out for at least 4 hours or overnight
1 1/4 cups buttermilk or 1 1/4 cups soy milk with 2 teaspoons of vinegar
An additional 1/3 cup of buttermilk (or 1/3 cup soy with teaspoon vinegar)
1 tablespoon vanilla extract
5 whole eggs
2 egg yolks (here’s your chance to be healthy, save the whites for an egg white omelet!, or another cake)
Vanilla Buttercream Frosting
2 cups (4 sticks; 460g) butter/margarine, softened to room temperature, very very very soft
1/8 teaspoon salt
1 and 1/2 teaspoons pure vanilla extract
6 Tablespoons (90ml) whole milk/cream/soy cream
8 cups (960g) confectioners’ sugar
Directions for cake:
Preheat oven to 325 F, not 350! 325.
Grease (or oil spray) 3 9 inch round cake pans and line the bottoms with parchment rounds or cut out rounds from parchment paper. Now grease the parchment paper as well. Set aside.
In a mixer bowl mix the flour, baking powder, sugar and salt briefly. Chunk the butter/marg and add it and the first amount (1 1/4 cups) of buttermilk and beat together till smooth. Scrape down the sides and bottoms of the bowl, make sure you don’t leave any chunks of butter unincorporated, mix again, batter will be quite thick and fluffy.
In a separate bowl, take the 1/3 cup of buttermilk and add to the eggs and egg yolks, and the vanilla and whisk together.
With mixer running on low, gently add 1/3 of the egg mixture to the batter, let mix in and continue with the last 2 amounts of egg mixture until completely incorporated into the batter. Scrape, scrape scrape and mix one more time.
Now measure by cups and evenly distribute your batter amongst the 3 prepared pans.
Place the pans in the 325 F oven and bake 28-30 minutes till nice yellow on top with light brown edges and a wooden toothpick in the center comes out clean. Let rest in pans at least 5 minutes and then carefully turn out onto wire racks (place rack over pan and flip out carefully), peel off parchment paper and let completely completely cool. I wrote completely twice on purpose. Just like the ridiculously soft butter you need, this too is a must. If you cheat, your buttercream frosting will melt into the cake and boom, there goes your hard work. COLD!! no cheating.
Directions for Vanilla buttercream frosting
In a mixer, using a whisk attachment, whip the butter/marg, salt, vanilla, milk and confectioners’ sugar, on medium till fluffy and creamy. Try to measure amounts exactly since if you do, this frosting is immediately spreadable and a joy to work with.
Take your cold cakes and spread a thin crumb coat (see above) on top of one layer, cover with the next layer, thin coat on top, cover with last layer and thin coat on top and all around sides of cake. Thin! Put in fridge for 1/2 an hour to set the crumb coat and it will when lightly touched be dryish and not sticky. Excellent. Then take a small heap of frosting and spread merrily over the top and sides of cake, adding more as needed to cover the cake completely. You will still have enough to put in a piping/pastry bag, with a decorative tip and pipe the edges of the cake and the top (see above). Refrigerate the cake about an hour before serving so it has time to set. Mazal tov and Congrats!!!
*https://smittenkitchen.com/2008/07/project-wedding-cake-the-cake-is-baked/
**https://sallysbakingaddiction.com/homemade-wedding-cake/


Hi, please can you recommend an Israeli margarine that will be good to use or frosting such as you made for the wedding cake. Regards and thanks
Hi Sue,
I confess I used the blue band brand, nothing special, since that’s what the local grocery shop had and I didn’t get a chance to buy something else. I prefer the Mazola brand if I can get it, but wasn’t available. So, if you can only buy the regular standard, it works! Happy baking!